
If you’ve ever tiled a wall or floor, you’ll know that grouting is the part that makes it all come together. It’s the final touch that turns a patchwork of tiles into something neat, polished and finished.
But it’s also the stage where many people panic a little. It can be messy, you’ve got to work quickly, and if you’ve never done it before, it feels like icing a cake with cement.
But don’t worry. I’ve been there, and once you get the hang of it, it’s actually quite satisfying. So, let’s walk through exactly how to grout tiles (and how to fix things if they go a bit wrong).
What Grout Actually Does
Before we start, let’s quickly cover why grout matters.
Grout fills the gaps between your tiles and those little lines that make everything look neat. But it’s not just for looks. It helps keep out moisture, stops dirt from getting underneath, and holds your tiles firmly in place.
If you skip grouting, you’ll end up with wobbly tiles, black mould creeping in, and edges that chip or crack. Basically, grout is what keeps your tiles looking good for years.
What You’ll Need
A quick checklist before you start:
Tile grout (choose the right one for your tiles)
A rubber grout float
Bucket and mixing stick
Clean sponge and a cloth
Grout sealer
Gloves
And a bit of patience (you’ll need that most of all)
If you’re regrouting or cleaning old tiles, you’ll also want a grout remover or a scraper handy.
How to Grout Floor Tiles

Floor tiles take a bit more work because you are dealing with gravity and larger gaps. Here’s a straightforward way to do it right.
Step 1: Prep the Area
Make sure your tiles and the spaces between them are clean. Any leftover adhesive, dust, or bits of debris will stop the grout from bonding properly.
A quick vacuum or damp wipe should do the job.
Step 2: Mix the Grout
Follow the instructions on the packet, but don’t rush it. Add a little water at a time and mix until you get a thick, creamy consistency. Think peanut butter, not soup.
Let it sit for a few minutes before using.
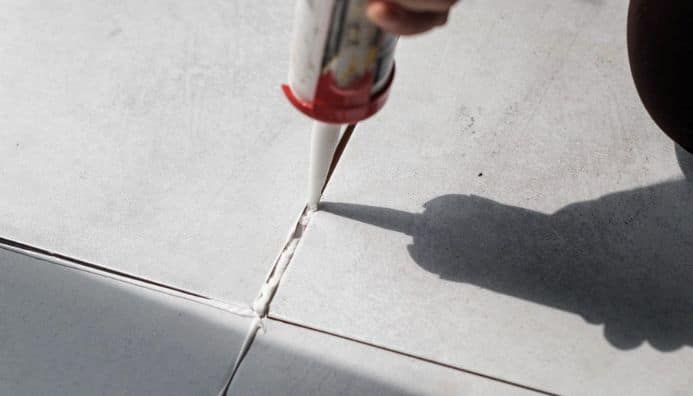
Step 3: Apply the Grout
Now for the fun part. Using your rubber float, scoop up some grout and spread it diagonally across the tiles.
Press firmly so it fills the joints completely. Work in small areas and don’t try to do the whole floor in one go or it’ll dry before you finish.
Step 4: Wipe Off the Excess
Once the joints are filled, use the edge of your float to scrape away extra grout. Then, after about 10–15 minutes, grab a damp sponge and wipe gently in circular motions.
Don’t use too much water, as it can wash the grout out.
Step 5: Let It Dry
Then leave it to set for at least 24 hours. Keep foot traffic to a minimum, though it’s tempting to check it, but don’t!
Step 6: Seal It
Once it’s completely dry, you need to apply a grout sealer. This helps protect it from stains, moisture and general wear. Trust me, this step is worth it, especially in kitchens and bathrooms.
How to Grout Wall Tiles
Wall tiles are a bit easier since you’re not kneeling down, but you’ve got gravity working against you; you should know that grout tends to slide if you overload it.
Here’s what works best:
Start from the top and work your way down. That way, any drips won’t ruin freshly done sections.
Use smaller amounts of grout at a time. It’s easier to control and gives you more time to clean.
Wipe the tiles often as you go. Once grout dries, it’s a nightmare to remove.
If you’re grouting corners or edges, switch to a silicone sealant instead of grout, as it will allow a little flexibility and stop cracks later on.
How to Remove Grout from Tiles
We’ve all been there; all you need is to step back and notice grout smeared across the tiles. Or worse, the old grout looks dull and needs replacing. Don’t panic.
If It’s Still Wet
Just grab a damp sponge or cloth and wipe it off. Easy.
If It’s Dried On
You’ll need a bit more elbow grease. Try a plastic scraper first (avoid metal as it’ll scratch the tiles).
If that doesn’t shift it, mix warm water and vinegar (about 3 parts water, 1 part vinegar) and wipe gently with a soft cloth.
If You’re Fully Removing Old Grout
Use a grout removal tool or a small oscillating tool with a grout blade. Take your time, as you don’t want to chip the tiles.
Once it’s out, vacuum the dust away so the new grout sticks properly.
How to Regrout Tiles
Sometimes cleaning isn’t enough. If your grout is cracked, mouldy, or falling out, regrouting is the best fix.
Remove the old grout – Use a grout remover or oscillating tool. Be patient.
Clean the gaps – Wipe away any leftover dust.
Mix and apply new grout – Follow the same method as above. Press it firmly into the joints.
Wipe and dry – Use a damp sponge to clean the surface, then leave it to set.
Seal it – Always finish with a good grout sealer for long-lasting results.
It’s amazing how much fresher a bathroom or kitchen looks after regrouting, as it can honestly make the space feel brand new.
How to Clean Grout on Floor Tiles
Even the best grout gets dirty over time, especially on floors. The good news? It’s easy to clean once you know how.
For Light Cleaning
Just warm water and a soft brush will do. Give it a quick scrub once a week and dry with a towel.
For Stubborn Stains
Make a paste with baking soda and water, spread it on the grout lines, and spray some white vinegar on top. Let it fizz for a few minutes, and that’s the magic happening, then scrub with a toothbrush or grout brush.
Rinse and dry thoroughly.
For Deep Cleaning
If it’s really grimy, use a proper grout cleaner or a steam cleaner. Always test a small patch first.
And remember: sealing your grout once or twice a year keeps it cleaner for longer.
Common Mistakes to Avoid
Even the pros mess up sometimes, but here’s what to watch out for:
Mixing grout too runny as it’ll crack later.
Using too much water when cleaning weakens the joints.
Leaving grout haze on tiles, it’ll harden and stick.
Forgetting to seal — you’ll regret it when stains appear.
Walking on floors too soon — patience really does pay off here.
If you mess something up, don’t stress. You can always scrape out a bit and redo that section.
Final Thoughts
So there you go, that’s how to grout tiles, from start to finish. It’s one of those jobs that feels tricky before you start but oddly satisfying once you get going.
Take your time, clean as you go, and remember that grout doesn’t have to be perfect. A few small imperfections give it that handmade touch (and nobody’s going to notice except you).
Whether you’re doing floor tiles, wall tiles, or giving your old grout a makeover, you’ll end up with a finish that looks clean, solid, and professional.
And the best part? You did it yourself.
Quick FAQ Recap
How to grout floor tiles?
To grout floor tiles, start by making sure the surface and joints are completely clean and dry. Mix your grout until it’s thick and smooth and not runny. Apply it diagonally using a rubber float, pressing it into the gaps. Once filled, remove any extra grout with the float’s edge. After 10–15 minutes, gently clean the tiles with a damp sponge, making circular motions. Leave it to dry for a full day before sealing to protect it from moisture and stains.
How to remove grout from tiles?
If the grout is still wet, a quick wipe with a damp sponge should remove it easily. If it’s already dried, use a plastic scraper or a commercial grout haze remover to get rid of the residue. For full removal before regrouting, use a grout removal tool to carefully scrape out the old grout from between the tiles. Take your time, as rushing can damage the edges of your tiles.
How to grout wall tiles?
When grouting wall tiles, always work from the top down to avoid drips landing on areas you’ve already finished. Mix your grout to a smooth consistency, and apply it using a small float or squeegee. Work in small sections and wipe away the excess before it hardens. Around corners or edges, switch to a flexible silicone sealant instead of grout as it prevents cracking as walls shift slightly over time.
How to regrout tiles?
Regrouting is simply replacing old, worn, or mouldy grout with a fresh layer. Start by removing all the old grout using a grout remover or multi-tool. Clean the joints thoroughly, then apply new grout just like you would on fresh tiles. Once it’s set, wipe away residue and apply a grout sealer to help it stay clean and waterproof. It’s a simple job that can completely refresh the look of your tiles.
How to clean grout on floor tiles?
To clean grout on floor tiles, start with a mild solution, take warm water and a soft-bristled brush. For deeper cleaning, make a paste with baking soda and water, apply it to the grout lines, and spray white vinegar on top. Let it bubble for a few minutes, then scrub gently and rinse. For very stubborn dirt or discolouration, use a grout cleaner or steam cleaner. Finally, sealing your grout every year will help it resist stains and stay bright for longer.